Aftercare
-
Wash your hands
Gently spray all sides of your piercing with sterile saline.
If needed, gently wipe away crusties using a q-tip or a folded up paper towel.
Dry your piercing using a hair dryer on the cool setting or lightly pat it with a clean paper towel.
Repeat 2-3x daily.
For oral piercings:
Follow the steps above for the outer portion of lip piercings
Rinse your mouth with water after eating and drinking.
Use alcohol-free mouthwash 2-3x per day.
Check out the in depth aftercare below for helpful tips and additional information about healing. If you have any other questions, do not hesitate to reach out! We’re here to help.
-
Congratulations! Your child got their first piercings. Now what?!
Wash your hands
Spray the piercing on the front and back of the earlobe with sterile saline. Do not use other products such as alcohol, peroxide, neosporin, etc.
If needed, gently wipe away any ‘crusties’ or dried blood using a clean q-tip or folded paper towel.
Lightly pat the piercing dry using a clean paper towel.
Aftercare should be done 2-3x per day. No more than this!
Let your child know not to touch, twist, pull or remove their jewelry.
Do your best to keep wet hair off of their piercing. This can cause issues due to moisture on the back side of the ears for an extended amount of time.
Let your child know to be extra careful when brushing their hair so they don’t snag their piercing.
Encourage your child to communicate any issues they may have.
Do not let your child swim in pools, lakes or the ocean for a few weeks following the piercing.
If you have any questions or concerns, contact us or come by the studio. We are here for you and happy to help!
piercingsbyatominfo@gmail.com
-
(Ear, Navel, Eyebrow, Nose, Bridge, Nipple, Surface, Genital, Etc.)
Your new piercing should be cleaned 2x per day with a sterile saline spray.
You can buy sterile saline from us during your visit or at most stores in the first aid aisle. Look for ‘wound wash’. Ingredients should only include sodium chloride 0.9% and water
Do not use:
Saline Contact Solution
Saline Nasal Spray
Isopropyl Alcohol
Hydrogen Peroxide
Hibiclens
Neosporin
Body/Hand Soap
Your own mixture of salt and water
Be sure to:
Wash your hands thoroughly before cleaning/touching your piercings
Dry your piercing using a hair dryer on the cool setting or pat it gently with a clean single-use paper towel. Do not use a cloth towel as these can harbor bacteria.
Complete aftercare after bathing/skincare. Residue from hair and skin products left on or around your piercing can cause irritation.
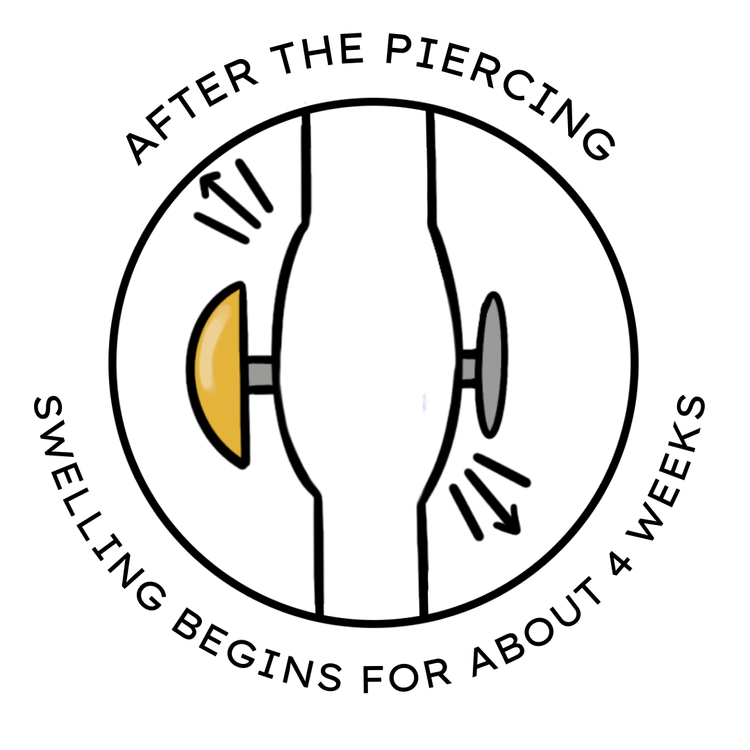
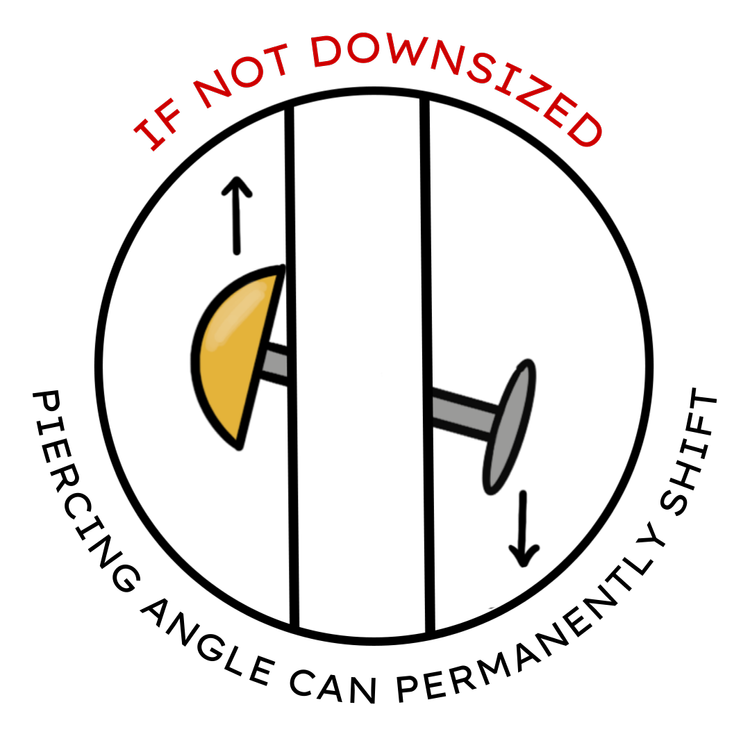
Return for a downsize. Try not to put this off as jewelry that is too long can cause your piercing to shift if you are sleeping on it or putting pressure on it otherwise. Longer jewelry is also more likely to get caught and cause your piercing to become irritated.
Do Not:
Touch your piercing unless you are cleaning it with freshly washed hands
Twist, rotate or pick at your piercing/jewelry
Remove your jewelry while healing. This can result in closure or shrinkage of the piercing channel making jewelry reinsertion difficult or impossible.
Swim for at least 14 days following your piercing
Put makeup directly on your healing piercing.
To Be Expected:
Bleeding, swelling, tenderness, throbbing, and/or bruising are normal immediately following your piercing
During healing, soreness, slight swelling, itching, crusties, and/or secretion of a whitish-yellow fluid are normal (this is not pus and is not cause for concern)
Let Us Know:
If your jewelry is sinking into your skin or is causing you discomfort. You may need a change-out for longer jewelry. We try to accommodate swelling with initial jewelry length but some people swell more than others.
If you are concerned about your piercing in general - we are here to help!
Be patient and continue cleaning your piercing for the entire healing process
Even if your piercing is no longer sore, swollen or having secretions - you need to clean it as directed. Piercings heal from the outside in, so although you may not be able to see it, healing is still taking place.
If your piercing should get snagged or hit, this can lengthen the healing process.
Helpful tips:
If you are healing a new ear piercing, you may benefit from purchasing a travel pillow - especially if you are a side or stomach sleeper. Lay your ear within the cut out section to avoid sleeping on your new piercing and causing irritation/pain.
Tight shirts and sports bras may be more comfortable while healing nipple piercings.
Info For Genital Piercings:
Additional cleaning after urination is not necessary.
Prince Alberts, Ampallangs and Apadravyas may bleed for the first few days. This is not cause for concern.
Be sure to clean your piercing with sterile saline solution after sexual activity.
Avoid contact with your partners’ bodily fluids.
No oral contact during healing.
-
(Labret, Medusa, Monroe, Tongue, Smiley, Tongue Web, etc)
*Vertical Labret and Vertical Medusa should follow standard piercing care
Your new piercing should be cleaned 2-3x a day using alcohol-free mouthwash. Aside from this, you should swish with water after eating and drinking.
If you received a lip piercing, clean the outside of your lip with sterile saline 2x per day.
You can buy sterile saline from us during your visit or at most stores in the first-aid aisle listed as ‘wound wash’. Ingredients should only include sodium chloride 0.9% and water
You Should Not Use:
Saline Contact Solution
Saline Nasal Spray
Isopropyl Alcohol
Hydrogen Peroxide
Hibiclens
Neosporin
Body/Hand Soap
Be sure to:
Wash your hands thoroughly before cleaning/touching your piercings
Complete aftercare after bathing/skincare. Residue from hair and skin products left on or around your piercing can cause irritation. (Lip piercings)
Return for a downsize. Try not to put this off as jewelry that is too long is more likely to cause damage to your teeth and/or gums
To Be Expected:
During the first week, you can expect significant swelling, light bleeding, bruising, and/or tenderness
Afterwards: Some minor swelling, crusties, and secretion of a whitish-yellow fluid are normal (this is not pus and is not cause for concern)
Tongue piercings take some getting used to and your jewelry may irritate the top and/or bottom of your mouth causing soreness. This will go away with time and downsizing.
Do Not:
Use mouthwash containing alcohol.
Touch your piercing unless you are cleaning it with freshly washed hands
Twist, rotate or pick at your piercing/jewelry
Bite on your jewelry or play with it
Share plates, cups, or utensils with others
Participate in oral contact including french kissing
Put makeup directly on your healing piercing
For Tongue Piercings:
Ideally, tobacco should be avoided during healing, but if you smoke, you should swish with alcohol free mouthwash afterwards.
If you drink alcohol: NO dark liquors/beer during healing
Avoid foods with small seeds such as strawberries, pickles, etc. that can get caught in the piercing canal.
To Reduce Swelling:
Let small chunks of ice melt in your mouth
Take an over the counter NSAID (nonsteroidal anti-inflammatory medication) such as Ibuprofen
Sleep with your head elevated
Try not to talk or move your jewelry more than necessary
Let Us Know:
If your jewelry is sinking into your lip or is causing you discomfort. You may need a change-out for longer jewelry. We try to accommodate swelling with initial jewelry length but some people swell more than others.
If you are concerned about your piercing in general - we are here to help!
Helpful Tip:
If you are healing a tongue piercing, eating may be difficult for the first few days. We recommend foods such as yogurt, mashed potatoes, soft noodles (broken into small pieces for minimal chewing), ice cream, and meal replacement beverages. Avoid spicy, acidic, salty and hot food/beverages for the first few days.
-
Piercing bumps, also known as irritation bumps, are a fairly common occurrence during the healing process. Particularly for cartilage piercings on the ear or nose. While they can be frustrating and sometimes painful, there are steps you can take to aid in their healing. Here's a guide on what you should do if you have a piercing bump:
1. Hands off!
One of the primary rules when dealing with piercing bumps is to avoid excessive touching, rubbing, or playing with the jewelry. Excessive meaning anything outside of routine cleaning. Continuous irritation can worsen the bump or even introduce infection. Therefore, it's best to leave it alone, allowing it time to heal. We never recommend twisting or turning the jewelry even while cleaning your piercing.
2. Use Sterile Saline
Per our normal aftercare instruction, continue applying a sterile saline to your piercing bump. This helps to promote healing and reduce inflammation. Be sure to use it after bathing/skincare because these products left on or around your piercing can cause irritation. Additionally, saline compresses may help. We recommend soaking a single-use paper towel in the solution, then gently pressing it against the bump for several minutes, one to two times per day.
We have sterile saline available at the shop, however it may also be found in the first-aid aisle of most stores as a ‘wound wash’. Be sure not to buy contact or nasal saline solutions.
3. Use a Travel Pillow
Is the bump on an ear piercing? You may benefit from using a travel pillow instead of a traditional pillow overnight. Pressure on your healing piercings is a very common culprit for bumps, which is a problem many side-sleepers run into. Travel pillows can allow you to sleep more comfortably and aid the piercing bump to heal.
Just place your ear inside the hole-portion of the travel pillow!
4. Downsize!
If an appropriate amount of time has passed, visit us for a downsize. When you were pierced, we will have used a longer post to accommodate for swelling. After a few weeks, you no longer need the extra room and it can cause problems for your piercing if you keep the longer jewelry length. Downsizing helps to avoid snagging/pulling on the jewelry which is notorious for causing a piercing bump. Additionally, downsizing helps avoid migration that may occur from pressure or bumping the jewelry repeatedly.
5. Be Patient
We understand piercing bumps are never fun and can be incredibly annoying to deal with. However, the vast majority of piercing bumps will go away on their own following proper aftercare and being extra careful. You just need to give your piercing a bit of time and love! As always, never hesitate to stop by and speak with us directly if need be. We are happy to help.


